
Summary
One of the challenges facing those wanting to develop IT applications to support the archaeological workflow is that everybody who has excavated sites has developed their own workflow based on the culture and structure of their organisation, the knowledge and skills of the people involved and the fieldwork they want to undertake.
Given this understanding, this manual page provides an overview of the archaeological workflow and then explains the support provided by Anchurus II.
The overall workflow
The figure below shows the overall workflow.
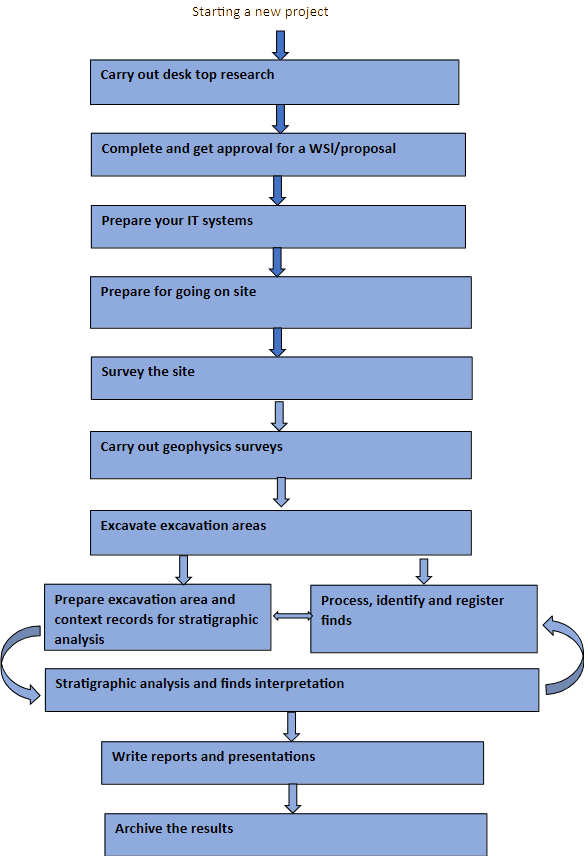
How Anchurus II supports the workflow
Anchurus II offers comprehensive support for archaeological workflows:
Carry out desktop research: this has the objective of understanding significant archaeological sites and finds round the site you are about to investigate. This normally involves collecting site data from Historic Environment Records and fieldwork reports, relevant Lidar data and maps and historic data.
Anchurus II supports this by encouraging you to record this evidence on maps using QGIS
Complete and get approval for a Written Scheme of Investigation (WSI) or project proposal: this can be in response to a request from a third party or because an area looks archaeologically interesting.
Anchurus II supports this by providing you with a draft of an appendix to your WSI/proposal that explains how you are going to use Anchurus II
Preparing your IT systems: recognises that today nobody is going to be able to carry out an excavation without some use of IT applications to manage and process the resulting volumes of data.
Anchurus II is designed to support the excavation of large, complicated sites with hundreds of contexts and thousands of finds and large teams of people. Faced with this challenge, you need to spend time preparing your IT systems (see user manual page Anchurus II applications and IT infrastructure)
Prepare for going on site: Before you go on site use maps and plans of the site to produce a spreadsheet of the grid references for your site grid control points in a form you can load into a global positioning system (GPS) or Total station. Beyond that, if you have a small site where you expect to excavate a few trenches with an experienced team and a prepared van full of equipment, this is comparatively a simple task. If you are preparing a community excavation with a large group of people with varying knowledge and skills, more care is needed because this is going to be a significant learning experience for many of those coming with you.
Anchurus II has been designed to support such a large community learning experience. Data collection is highly structured with most of it being written by hand on paper and permatrace. This approach has been adopted because it supports one to one learning as excavation leaders encourage less experience diggers to record what they see and then review their work.
One of the steps you need to take before you go on site is to prepare binders with blank paper forms. Another step is to produce a list of control points for your site grid. Ideally, these should be loaded into your global positioning system (GPS) or Total station ready for use.
Survey the site: The first task to be undertaken when you get on site is to establish the site grid using the grid of control points that you prepared earlier. This involves walking round the site using a global positioning system or Total Station to put in place the survey grid control points, ideally with labels with their grid references.
Anchurus II supports this activity by providing guidelines for defining your site grid and how to use QGIS to create a plan of your site grid.
Carry out geophysics surveys: if your WSI /proposal calls for a geophysics survey, it should have specified the equipment to be used and areas to be surveyed. Anchurus II enables you to record anomalies found in earth resistance, gradiometer and ground penetrating radar data and to integrate them with results of the excavated stratigraphic analysis.
Anchurus II supports this activity by providing you with guidelines on how to collect data in the field, process it, use QGIS to plan and label anomalies and record them in the Anchurus II database so that the anomalies can be amalgamated with excavation data to enhance the archaeological interpretation of the site.
Excavate excavation areas. In the first instance, these areas are identified in the WSI/Proposal and, if you are working to a tight timescale and budget, this is what often happens. However, if you are less constrained, the results for geophysics surveys and excavation work can lead to excavation areas being extended and new areas being opened.
In all cases, Anchurus II encourages you to have a rigorous process for recording contexts using context forms, plans, spot heights, section drawings , photographs and stratigraphic matrices and for collecting bulk, special finds and soil and radio carbon samples.
The key objective is to enable you to leave site having collected as much data as possible.
Prepare excavation area and context records for stratigraphic analysis: This work involves working on the records from each excavation area and:
- Working on context forms to ensure that they are correctly recorded.
In Anchurus II, they are recorded both on the site shared drive and in the site database
- Developing stratigraphic matrices which record the stratigraphy of all the context records in each excavation area.
In Anchurus II release 2 stratigraphic matrices are recorded using Draw IO and stored on the site shared drive
- Developing a geopositioned annotated plan of each context.
In Anchurus II, each such plan should be held in two layers in QGIS. One layer records the geopositioned outline plan of the context, the other records the context annotations such as its contextId, its name and the spot heights recorded for the context. The contextIds are used in the filenames. This arrangement allows the plans to be browsed using the QGIS browser.
Process, identify and register finds: During a typical excavation you can reveal finds in at least 15-20 different material types. You start work on these by separating them by material type, processing each material type in accordance with recommended practice, labelling them, including them in a finds register and filing them in boxes The next step usually involves working with a find specialist who will group them into groups based on a combination of evidence seen on or in the find and knowledge of how and when it was produced.
Anchurus II supports this activity by recommending that for each material types, you process them, register in the Anchurus II database and create a find filing system of boxes so you know where to find them. Once they are securely filed, you should start working with a find specialist to identifying findgroups and date the finds. A findgroup is a collection of finds thatshare production characteristics. For example, they were made of the same material, they were made in the same place and during the same time period.
Note: You are effectively using object oriented data analysis methods which are widely used in the IT industry.
As a result of doing this, you can use Anchurus II to record finds and the findgroups that represent how, when and where they were produced. This will help you to understand the significance of the finds documented in a finds report and their contribution to interpreting the site.
During this process you can use Anchurus II queries to gather data for your find reports.
Stratigraphic analysis and finds interpretation: Stratigraphic analysis is a method where you identify the phases of use of a site and groups of contexts which represent datable structures or areas of human activity. In some cases it works bottom-up analysis insofar as your excavators have identified a readily datable structure such as a round house or an area of iron working debris. In other cases it may be top-down analysis because you already have written evidence of the people who lived on the site with key dates such as the date they bought the property or the date they died and left the property in a will. The Archaeologists Guide to Good Practice handbook, encourages you to aggregate the contexts into subgroups, groups and phases and establish their data periods.
Finds interpretation is tightly bound with stratigraphic analysis insofar as the dates of finds found in a context underpins the context data period. More significantly, an analysis of the geoposition of the contexts associated with a find group helps explains how different groups of people on site carried out their work.
Anchurus II provides lots of support for stratigraphic analysis and finds interpretation. By this stage, your database will hold details of contexts, finds and find groups and the links between them. You will also have a shared filestore with digital copies of stratigraphic matrices for the different excavation areas all your context plans and some understanding of the phases, groups and subgroups. Further to this, your finds work should have identified a number of findgroups and finds with their production dates.
Anchurus II assists the actual stratigraphic analysis by recording relationships between phase, groups, subgroups/sets, anomalies identified in geophysics and other surveys and the date periods that have been assigned to them; all linked to sections of your archaeological reports. Date assignments are supported by an algorithm which aggregates the dates of finds found in phases and groups.
Write reports and presentations: This is the output of an excavation. Reports enter the archaeological records. Presentations including websites, videos and exhibitions present the results of an excavation to a wider audience.
Anchurus II supports this work through its template for a shared filestore which provides a comprehensive filing system for everything associated with an excavation.
Archiving the results of an excavation: This is the final stage of an excavation. Interesting finds are deposited in museum stores; digital files are deposited in digital archives.
The key to a digital archive is the metadata which explains the meaning of every item of data. Every item of data recorded in an Anchurus II database is checked by both the software and by the archaeologists. The meta data is an integral part of an Anchurus II database and hence is archived with it. Similarly, the files held in the shared filestore are of a limited number of standard file types such as PDF/A files and shape files all of which can be held and maintained by a digital archiving system such as the UK Archaeology Data Service.
Finally, as find specialists work their way through the finds from a site, there are facilities in the find database records to tag a find as worth depositing in a museum store. The find specialists can also identify finds that you should keep and hold in your local reference collections. Anchurus II has facilities for recording these local collections so they can be used to identify finds from your next excavations.
Recording workflow
Managing workflow is key to completing a successful excavation project from producing its WSI/proposal to depositing finds in a museum store and documents in a relevant Historic Environment Record, a national digital archive such as the Archaeological Data Service or in your organisation’s archive.
Managing workflow is best handled using project management software or the project leader’s spreadsheets.
The Anchurus II approach to supporting workflow management is to provide every item of information held in the Anchurus database with a workflow field which allows you to record information about the position of that item in its workflow.
Andrew Hutt
Version 09
14/8/2026